


Requirements:
A banned JTAG'd Xbox 360
Auto Xbins to download XeXmenu and Xport360
An unbanned KV_dec.bin (aka a key vault)
360 Flash Tool
Flash360
A Flash Drive
Your CPU Key
The newest version of FreeBOOT( .032 for Xenon, Zephyr, and Opus and .030 for Jasper & Falcon)
Downloading and Installing XeXmenu(skip if already installed)
1. After downloading Xbins, open it. Wait for it to connect to the server. Then click Xbox 360>dashboards>XeXMenu>and then double click xexmenu_v1.1.rar to download it.
2. Navigate to where ever you download XeXmenu to. Extract the C0DE9999 folder anywhere.
3. Connect your Xbox 360 HDD to your computer.
4. Open Xplorer360 and navigate to Partition 3>Content>00000000>and put the C0DE9999 folder in the 0000000000 folder.
Putting Flash360 on your Flash Drive & Getting Your FreeBOOT Image
1. Plug your Flash Drive into your computer.
2. Open your Flash Drive. Put the contents(the media folder and the Flash360.xex) of Flash360 into the root of your Flash Drive.
3. Disconnect your Flash Drive from your computer and plug it into any of the USB slots on your JTAG.
4. Turn your JTAG on and go to My Xbox > Game Library > XeXmenu 1.1
5. In Xexmenu press RB a couple times until you are in the USB directory and you can see the media folder and Flash360.xex file. Then click the Flash360.xex file.
6. Your screen should now look like the picture below:
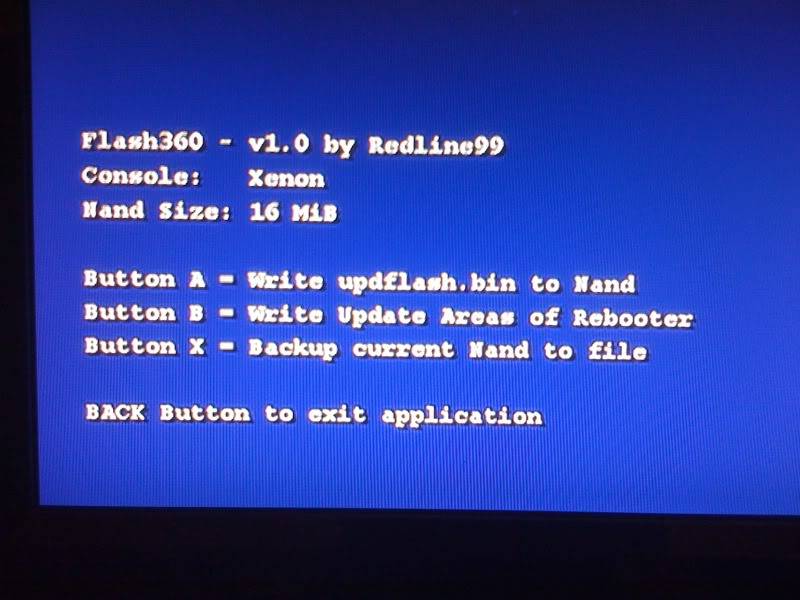
Press X on that screen to make a backup of your NAND image. Then just follow the on-screen instructions from there.
7. Once you are done getting a backup of your NAND image, turn your JTAG off and disconnect your Flash Drive.
Patching Your New KV to Your FreeBOOT Image
1. Connect your Flash Drive to your computer and open it.
2. You will see a file in the root of your Flash Drive called "flashdmp.bin". That is the backup of your NAND image. Place that somewhere on your computer like your desktop.
3. Now open 360 Flash Tool. Then open your flashdmp.bin file by clicking the "..." button.
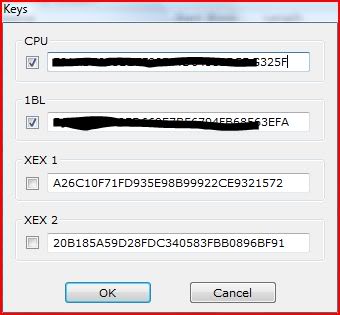
4. Click the Keys tab at the top. Now you want to check the "CPU" and "1BL" boxes. Replace the 00000000's for the CPU key with your JTAG's CPU key(to get your CPU key, turn your JTAG on by pressing the eject button. Then look at the fuse sets. Fuse sets 3 and 5 combined make your CPU key. You may want to take a picture because it moves fast. If you wait until it stops scrolling it also shows your CPU key and DVD key at the bottom of the screen.) And the 1BL box should be replaced with "DD88AD0C9ED669E7B56794FB68563EFA" (without quotes). Once you have entered both click OK.
5. Now re-open your flashdmp.bin file and all of your consoles info(Seria, DVD, OSIG, etc.) should be there because you entered those keys.
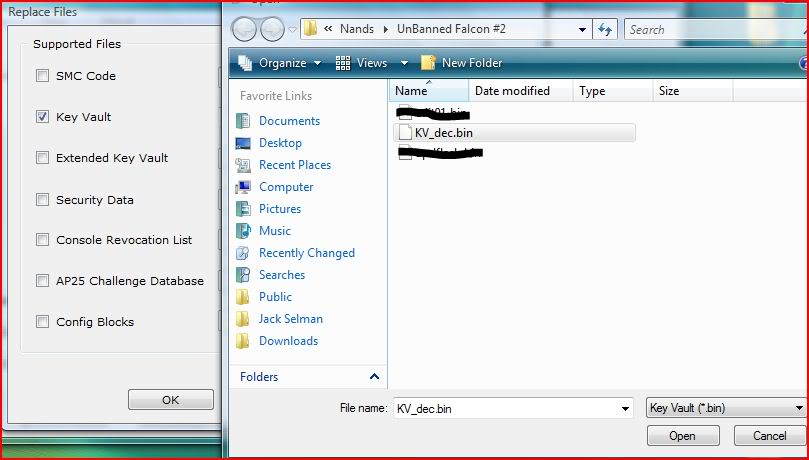
6. Now click "Import" and check the "keyvault" box as shown below.

7. Find your unbanned KV_dec.bin file that you should already have and open it.
8. Save that file as test.bin
9. Now open test.bin by clicking the "..." button in 360 Flash Tool.
10. Patch the keyvault by selecting "patch" and checking the box that says "Patch Key Vault", but do not click "OK" yet. As shown below.
 +
+
11. Now open 360 Flash Tool again while you still have the other one running. And open the flashdmp.bin file. Now click "Patch" and look at your DVD and OSIG.
12. Now go back to the 360 Flash Tool where you were patching the Key Vault in step 10.
13. Change your DVD and OSIG to match the ones in step 11 (If you don't do this correctly, your drive will not be able to read games). Then when they are changed click OK. Save that file as "updflash.bin"(without quotes).
14. Now close both 360 Flash Tool's.
Putting Your New FreeBOOT Image on Your NAND
1. Take your updflash.bin file and put it on your Flash Drive that has Flash360.xex and the media folder in it. If flashdmp.bin is still on the Flash drive then delete it.
2. Plug the Flash Drive into your JTAG.
3. Turn your JTAG on and navigate to My Xbox > Game Library > Xexmenu 1.1
4. Press RB a couple times until you are in the USB directory. Then click on Flash360.xex and it will launch.
5. You should be back in this screen:
6. Press "A" to write updflash.bin to your NAND. That is the file that we patched your new KV to.
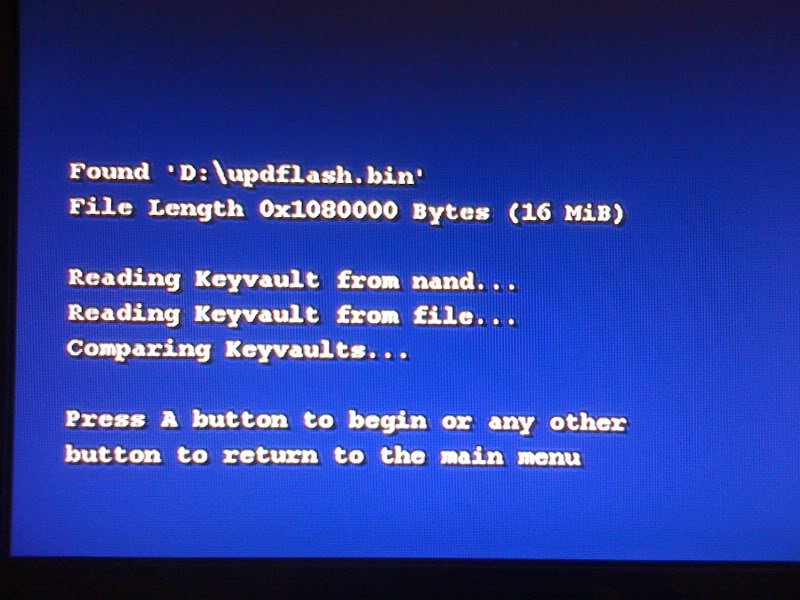
7. On the next screen press "B" to flash the image with a different KV.
8. Press "start" and a KV mismatch will occur.
9. Press "A" to allow the flash to start as shown below.
10. Select the "Back" button when the flash has completed to back out to the main menu. As shown below.

11. Then press "Back" again to exit Flash360 and then Flash360 will shutdown your console. You do not want to go to the dashboard.
12. Then unplug your power supply from your Xbox after the console has shutdown. Leave it unplugged for about 10 seconds. Then plug it back in and reboot your console.
Congratulations! You have just successfully injected a new KV and unbanned your JTAG'd Xbox 360!
A banned JTAG'd Xbox 360
Auto Xbins to download XeXmenu and Xport360
An unbanned KV_dec.bin (aka a key vault)
360 Flash Tool
Flash360
A Flash Drive
Your CPU Key
The newest version of FreeBOOT( .032 for Xenon, Zephyr, and Opus and .030 for Jasper & Falcon)
Downloading and Installing XeXmenu(skip if already installed)
1. After downloading Xbins, open it. Wait for it to connect to the server. Then click Xbox 360>dashboards>XeXMenu>and then double click xexmenu_v1.1.rar to download it.
2. Navigate to where ever you download XeXmenu to. Extract the C0DE9999 folder anywhere.
3. Connect your Xbox 360 HDD to your computer.
4. Open Xplorer360 and navigate to Partition 3>Content>00000000>and put the C0DE9999 folder in the 0000000000 folder.
Putting Flash360 on your Flash Drive & Getting Your FreeBOOT Image
1. Plug your Flash Drive into your computer.
2. Open your Flash Drive. Put the contents(the media folder and the Flash360.xex) of Flash360 into the root of your Flash Drive.
3. Disconnect your Flash Drive from your computer and plug it into any of the USB slots on your JTAG.
4. Turn your JTAG on and go to My Xbox > Game Library > XeXmenu 1.1
5. In Xexmenu press RB a couple times until you are in the USB directory and you can see the media folder and Flash360.xex file. Then click the Flash360.xex file.
6. Your screen should now look like the picture below:
Press X on that screen to make a backup of your NAND image. Then just follow the on-screen instructions from there.
7. Once you are done getting a backup of your NAND image, turn your JTAG off and disconnect your Flash Drive.
Patching Your New KV to Your FreeBOOT Image
1. Connect your Flash Drive to your computer and open it.
2. You will see a file in the root of your Flash Drive called "flashdmp.bin". That is the backup of your NAND image. Place that somewhere on your computer like your desktop.
3. Now open 360 Flash Tool. Then open your flashdmp.bin file by clicking the "..." button.
4. Click the Keys tab at the top. Now you want to check the "CPU" and "1BL" boxes. Replace the 00000000's for the CPU key with your JTAG's CPU key(to get your CPU key, turn your JTAG on by pressing the eject button. Then look at the fuse sets. Fuse sets 3 and 5 combined make your CPU key. You may want to take a picture because it moves fast. If you wait until it stops scrolling it also shows your CPU key and DVD key at the bottom of the screen.) And the 1BL box should be replaced with "DD88AD0C9ED669E7B56794FB68563EFA" (without quotes). Once you have entered both click OK.
5. Now re-open your flashdmp.bin file and all of your consoles info(Seria, DVD, OSIG, etc.) should be there because you entered those keys.
6. Now click "Import" and check the "keyvault" box as shown below.
7. Find your unbanned KV_dec.bin file that you should already have and open it.
8. Save that file as test.bin
9. Now open test.bin by clicking the "..." button in 360 Flash Tool.
10. Patch the keyvault by selecting "patch" and checking the box that says "Patch Key Vault", but do not click "OK" yet. As shown below.
+11. Now open 360 Flash Tool again while you still have the other one running. And open the flashdmp.bin file. Now click "Patch" and look at your DVD and OSIG.
12. Now go back to the 360 Flash Tool where you were patching the Key Vault in step 10.
13. Change your DVD and OSIG to match the ones in step 11 (If you don't do this correctly, your drive will not be able to read games). Then when they are changed click OK. Save that file as "updflash.bin"(without quotes).
14. Now close both 360 Flash Tool's.
Putting Your New FreeBOOT Image on Your NAND
1. Take your updflash.bin file and put it on your Flash Drive that has Flash360.xex and the media folder in it. If flashdmp.bin is still on the Flash drive then delete it.
2. Plug the Flash Drive into your JTAG.
3. Turn your JTAG on and navigate to My Xbox > Game Library > Xexmenu 1.1
4. Press RB a couple times until you are in the USB directory. Then click on Flash360.xex and it will launch.
5. You should be back in this screen:
6. Press "A" to write updflash.bin to your NAND. That is the file that we patched your new KV to.
7. On the next screen press "B" to flash the image with a different KV.
8. Press "start" and a KV mismatch will occur.
9. Press "A" to allow the flash to start as shown below.
10. Select the "Back" button when the flash has completed to back out to the main menu. As shown below.
11. Then press "Back" again to exit Flash360 and then Flash360 will shutdown your console. You do not want to go to the dashboard.
12. Then unplug your power supply from your Xbox after the console has shutdown. Leave it unplugged for about 10 seconds. Then plug it back in and reboot your console.
Congratulations! You have just successfully injected a new KV and unbanned your JTAG'd Xbox 360!

